Cabbage Slaw

A while back, Andrew and I were planning dinner. There was some chicken breasts in the freezer. Protein, check. But what to make with it? Wanting to utilize ingredients I already had, I took stock of the fridge and saw that I had half a head of cabbage, capers, thyme, shallots, and some preserved lemons, not to mention a bunch of vinegars in the pantry. So I thought, why not make some kind of cabbage slaw with a lemon-caper vinaigrette and place it on top of some mixed greens? It would be a nice, simple salad to pair with the poultry.

Andrew was skeptical of this idea. He loves cabbage, but the idea of it being practically the only thing in the salad wasn’t appealing to him. I understood. Raw cabbage can be tough and a little bitter. To counteract that, I finely shredded the cabbage using a mandoline. I wanted the cabbage to be really fine so that the cabbage would absorb the dressing better, softening its toughness and reducing its bitterness, yet still retain a pleasant crunch.

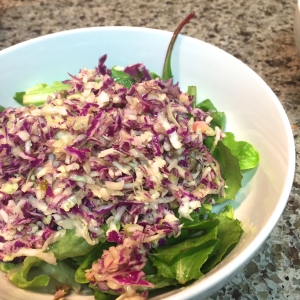
I expected the slaw to be good, but I wasn’t expecting Andrew’s reaction. He loved it. He said it was so good I should bottle the dressing and sell it. While I’ll leave the salad dressing business to Paul Newman, it was one of the best compliments on my cooking Andrew has given me. Perhaps his low expectations contributed to the inflated praise, but I’ll take it! As you can see, the slaw doesn’t look like much, but it packs a surprising amount of flavor. The preserved lemon is what really makes this recipe pop. It brightens the dish with splashes of lovely Meyer lemon without overpowering everything else.

IMG_2476

I’ve made this slaw using a mix of green and purple cabbage as well. It tastes the same, but turns everything pink. It just depends on what aesthetic you’re going for. Add lentils (I like the little black kind with this) to make a more substantial lunch salad during the week. Because cabbage is so hearty, this keeps well in the fridge for a couple of days without turning soggy. I like to make large batches to have ready-made salads for dinner and/or lunch for a few days. Recipe is below!

IMG_2539

CABBAGE SLAW

This recipe is easily scalable for larger batches. The dressing is forgiving so the measurements below are really just a guide. I mostly make this to taste myself. I also realize that preserved lemons are not exactly a pantry staple, so if you don’t have any I’d use lemon zest and a bit of salt as a substitute. Maybe a little lemon juice as well, but then I’d reduce the amount of vinegar or it will become too acidic. I haven’t tried this substitution myself, but I’m sure it would work well enough. You won’t get those bites of salty Meyer lemony goodness, but you’d still get a nice lemon flavor which really livens the dressing.

INGREDIENTS (makes about 2-3 servings)

  • Quarter head of cabbage
  • Mixed greens
  • 1/4 cup olive oil
  • 2 tbsp champagne vinegar
  • 1 small shallot, finely diced
  • 1 clove garlic, minced and smashed or pressed through a garlic press
  • 1 tbsp capers, roughly chopped
  • 1/4 of preserved lemon, flesh removed, rind rinsed and minced.
  • Fresh thyme to taste (if you have on hand. Dried works too, just use less)
  • Pepper to taste

METHOD

  • Set the cabbage and mixed greens aside.
  • In a small bowl, whisk the remaining ingredients together until emulsified. Add more oil, vinegar, pepper, and/or thyme to taste. Let sit for an hour or so (if you have time) to let the flavors meld. Taste again and adjust any ingredients as needed.
  • Meanwhile, finely shred the cabbage. I prefer to use a mandoline, but a food processor will work, too. You could, of course, slice it by hand, but I can never get it as thin as I want when I use a mandolin.*
  • Mix dressing with cabbage. You can let it sit for 10-15 minutes to let it marinate or use right away.
  • Lightly dress mixed greens with olive oil and champagne vinegar. Top with dressed cabbage and serve.

*If you like thin veggies for anything, you should totally get a mandoline. It’s a cooking game-changer. I got a PL8 Professional Mandoline and I love it. There are multiple cut settings, it’s easy to clean, and there’s many safety precautions so sliced fingers can easily be avoided. 🙂

The Kim’s House of Prime Rib

My mom makes a great prime rib. She roasts potatoes and bell peppers in the roasting pan along with the meat so they cook in all the drippings. It’s so good. In her words, “It’s my favorite entertaining meal. So easy, yummy, and you get to enjoy your guests without concentrating on the food.” I’ve never made her prime rib recipe before, but last weekend I had my chance.

On Saturday, Andrew and I hosted our friends Cory and Margaret, and Shane and Savannah for dinner. I have no photo of them. Despite telling them I was going to take their picture specifically for this blog post, I had too much fun merrymaking that I completely forgot. So it goes. Anyway, I wanted to make a good ole’ meat and potatoes meal, and what better way to do that than with prime rib? So I emailed my mom for the recipe (full recipe at the end of this post).

Although three ribs worth serves six (2 people per rib), I wanted to make sure I had leftovers so I opted for four ribs. Little did I know how much meat that was. I came home with almost 10 pounds of beef, including the bones (because of course I’m going to make stock with it). My mom only gave me a general cooking time: 1 1/2 hours for three ribs, 2 hours for four. Because I had so much meat, I wanted to make sure I cooked it long enough so I Googled prime rib cooking times and came across this great post on prime rib by Simply Recipes.

It was quite thorough about cooking times:

  • 12-14 minutes per pound for rare (115°F)
  • 15-17 minutes per pound for medium rare (120°-130°F)

The post goes into more detail about other factors that affect cooking times, so if you are planning on making this at any point, I highly recommend reading it. I found it really helpful and adapted my mom’s recipe to include some of their tips. (And by the way, my mom was almost spot on about the 2 hour cooking time. Without the bones, the roast came to 7 1/2 pounds. Do the math and you are at just about 2 hours depending on how rare you want it. Goes to show you should always listen to your mother!)

When I seasoned the meat and added the chopped the veggies, my roasting pan was quite full:

IMG_2582

I popped this baby in the oven and it didn’t take long for the apartment to start to smell amazing. While the beef was roasting, I prepped a salad of radicchio, butter lettuce, shaved fennel, and a champagne vinaigrette. It’s a simplified version of Bon Appetit’s Crunchy Winter-Vegetable Salad, and looks very homey in my grandmother’s wooden salad bowl set.

IMG_2588

The salad didn’t take long to prepare and with the rest of the meal in the oven, not needing any attention, I had over an hour to spare before our guests arrived. I actually had time to test-drive the featured cocktail of the evening and actually finish it! Cory and Margaret are big whiskey fans, so I decided to make whiskey sours using a recipe from RecipesPlus. I had a bunch of Meyer lemons thanks to a colleague who literally brought in buckets of them to work, and with the orange syrup leftover from my candied orange peels, I had the ingredients to make the best whiskey sour I’ve ever tasted. Now I need to candy more orange peels just so I can get the syrup so I can keep making this cocktail. It really was that special ingredient that lifted it from being a good cocktail to Captain Awesome.

IMG_2586

The prime rib was done just about when my friends arrived, which was perfect because we were able to have a cocktail while the meat rested. It turned out beautiful. It was juicy and tender and pink and silky from all the marbled fat that makes this cut of meat “prime.” I was quite impressed with myself. I will be the first to tell you everything that I did wrong with a dish. That’s kind of what this blog is all about, but I really can’t cut myself down this time. I did a fantastic job and I don’t mind tooting my own horn at all. We joked about never needing to go to The House of Prime Rib when you can just come to the Kim’s.

IMG_2587

IMG_2590

Look at that perfect pink!

But I’m not done yet. Because there is still dessert. Andrew and I were in Napa the weekend before last and had a great pots de creme at Zuzu, one of our favorite restaurants up there. As I was eating it, I thought, “I could make this.” So I did. I found recipes for pots de creme that call for baking the custard like creme brulee. That’s kind of pain to do, so I opted for a simpler Pots de Creme recipe from the Food Network where you slowly thicken the milk, cream, egg yolk, and sugar into a custard and blend it with chocolate. From there you pour it into whatever dishes you want to serve it in and chill in the fridge for a couple of hours. Because it needs a few hours to set, make this in the morning you are going to serve. Then all you need to do when it’s dessert time is top with whipped cream, grate some chocolate over it for pizzaz, and you have one hell of a dessert.

IMG_2592

IMG_2593

This was the most stress-free dinner party I have thrown yet. I wasn’t scrambling to set the table, or running around crazy doing the final steps for multiple dishes. Everything was ready, on time, with space to enjoy a cocktail and most importantly my guests. Prime rib is now my favorite entertaining meal. So easy, yummy, and you get to enjoy your guests without concentrating on the food. Words (and food) never rang truer.

RECIPES

Prime Rib

(serves 6)

INGREDIENTS

  • 3 ribs of prime rib (bones removed). If you’re my mom you give the bones to the dog. If you’re me you freeze them for stock.
  • Herbes de Provence
  • Rock salt (or any course salt you have on hand)
  • 4 russet potatoes
  • 2 green bell peppers
  • 1 large yellow onion

METHOD

  • Take the meat out of the fridge 3 hours before roasting to get it to room temperature. Place in roasting pan and cover the entire roast with rock salt.
  • When it’s time to roast, preheat the oven to 500°F.
  • Meanwhile, dice the potatoes, bell peppers, and onion. Mix together and drizzle with olive oil.
  • Pat the roast dry with a paper towel. Generously season all over with with Herbes de Provence.
  • Add the potatoes, bell peppers, and onion around the prime rib.
  • Roast for 15 minutes at 500°F, then turn down to 325°F and roast for about 1 hour and 15 minutes (12-14 minutes per pound for rare and 15-17 minutes per pound for medium rare).
  • Take out prime rib and let it rest for about 20 minutes.
  • Mix the potatoes and taste for doneness. If the potatoes are not fully cooked, leave the oven on and continue to cook while the meat is resting. If they are cooked, turn the oven off and keep the potatoes in the oven to keep warm.
  • Slice the prime rib and place on the serving platter. Arrange potatoes around the meat and serve!

Tangerine Sorbet with Candied Peels–Valentines Day 2016 (part 2)

When I was planning my Valentine’s Day menu, dessert was not on my radar. I knew the dumplings were going to take up most of my time and I didn’t want to stress myself out by planning elaborate dessert. I was just going to do something simple like fresh berries with a little Grand Marnier (one of my parents’ go-to desserts). But a recipe for tangerine sorbet by David Lebovitz came into my inbox the Friday before Valentine’s Day and I thought, “This looks easy enough, tangerines are in season, it’ll go nicely with my menu, and I’m working from home today. I have time to do this.” So I took a mid-morning break from work and walked to my local produce market to pick up some minneola tangelos (though any tangerine or mandarin orange varietal would have worked, too).

IMG_2531

This recipe does require planning ahead (which for once I successfully did!). You have to juice the fruit, add sugar, some zest, and a little Grand Marnier, and let it chill overnight. Since I was working from home and didn’t have to take my 45 minute commute home, I was able to start on this right at 5 pm, perfect for stress-free prep, i.e. I am not juicing fruit at 9:30 at night. I busted out the juicer and juiced about 8 tangelos, enough to get 4 cups. The juicer is a pain to clean, so if you have a large citrus squeezer or a hand juicer, I recommend going that route. I have neither, so the juicer it was. I ended up with a little more than 4 cups of juice so I used the extra to make screwdrivers for happy hour. Another plus for starting this project at 5 pm.

The next day I took the juice from the fridge and put it in the freezer. Taking instructions from Lebovitz on how to make ice cream without a machine, I took the juice out of the freezer every half hour, for a couple of hours, and blended it with my stick blender (you can also mix with a hand mixer or with a spatula by hand). This allows for a smooth, consistent texture as it slowly freezes. Otherwise you’ll just have a big bowl of popsicle. While it would still be delicious, it would prove a bit difficult to eat.

Lebovitz also candied the peels of the fruit to serve alongside the sorbet. I thought that was a great way to minimize food waste, and decided to do the same. So I peeled the tangelos before juicing to candy later. However, Lebovitz’s recipe for candied orange peels is not available online, so I had to do some research for a recipe. To candy a citrus peel, you basically boil it in sugar water. But I found many methods to do this, with a variety of sugar to water ratios, boiling times, etc. Considering my history of candying fruit and trouble with boiling liquids with a high sugar content, I wanted to be careful about what recipe I chose. I didn’t want to make a sauce-pan full of hard candy.

What most recipes agreed on was cutting the peels of whatever citrus fruit you’re using (orange, lemon, lime, grapefruit, or a mix) into 1/4 inch strips.

IMG_2540

But that is where the recipes diverge. Some recipes blanch the peels a number of times to remove the bitterness, like Jacques Pepin does in his recipe (this video of his is also helpful). Others boil the strips once for 10-15 minutes, like Martha Stewart. I decided to go the multiple blanch route because that’s what I saw people do more often. After blanching, you boil the peels in sugar water for about 8-10 minutes, until they are translucent. Martha Stewart uses a 1:1 ratio of water and sugar. But Jacques Pepin uses a 2:1 ratio. I randomly decided that Jacques has more authority in this matter and went with the 2:1 ratio. I was also afraid of the 1:1 sugar to water ratio, reasons of which I stated previously.

IMG_2542

peels after their sugar-water boil

After the peels have been boiled, you toss them in sugar to coat. Martha’s recipe recommends letting them dry out for about an hour before coating. Jacques doesn’t. I went with Jacques’ method again, but found that the sugar clumped together more than I would have liked. Even after being left to dry for an hour, they were still pretty wet. Martha may have been on to something with her drying instructions.

IMG_2545

Although the peels turned out very tasty, I was not 100% satisfied with how these came out, and I am going to keep playing around with the recipe. I think a lot of the trouble has to do with how much peel you have and knowing how to scale the sugar to water ratio accordingly. Because you’re not always going to have 8 oranges worth of peel. Clearly, I do not have my magic method for candied orange peels yet, but my adapted recipe for this particular batch of peels is below.

I leave you with the final outcome of the sorbet, garnished and everything. Another good way to server it would be to chop the candied peel and sprinkle it on top so that you can have little bits of candied peel in each bite.

IMG_2568

Recipes

Candied Orange Peels (adapted from Jacques Pepin)

INGREDIENTS

  • 2 cups orange peels (or any mix of citrus peels), cut into 1/4 inch strips
  • 2 cups water
  • 1 cup sugar (plus 1/3 cup for coating)

METHOD

  1. Peel the zest of oranges, leaving off as much of the white pith as possible. Julienne the peels into 1/4 inch strips.
  2. In a saucepan, cover the strips in water and bring to a boil. Cook for 10 seconds. Drain peels in a strainer and rinse with cold water. Repeat one more time.
  3. Return the peels to the saucepan with 1 cup sugar and 2 cups of water. Bring to a boil and cook, uncovered, until the mixture starts to thicken and the peels turn translucent, about 8-10 minutes, though it took a little longer for me, probably becuase I simmered rather than boiled. I was scared of making hard candy. (This is the step where I need to make the most adjustments, perhaps in sugar to water ratio or cooking temperature.)
  4. Strain the peels, saving the syrup for another use (like cocktails or to sweeten tea).
  5. Spread 1/3 cup of sugar on a tray or medium sized bowl. Add the peels and toss, separating the pieces so that each strip is coated with sugar. Transfer the strips to a cooling rack and let stand for at least an hour, until dry. (Again, my peels didn’t really dry, so I will try letting them dry a bit before tossing in sugar.)
  6. Store in a jar or container with a tight-fitting lid. You can refrigerate or let it stand at room temperature.

Pork Soup Dumplings–Valentine’s Day 2016 (part 1)

Valentine’s Day is just another day for the Kims. We don’t buy each other gifts or go out to a nice restaurant, but it does provide a reason to get flowers for our table and make an elaborate meal at home, not that you ever need a reason to do either. This year’s V-day menu was pork soup dumplings (all from scratch), green beans, and homemade tangerine sorbet with candied tangerine peels, with French 75 cocktails to enjoy throughout.

I spotted this recipe for pork soup dumplings in an issue of Bon Appetit about a year ago and saved it as a “someday” cooking project. Then sometime in the new year it popped up again in BA’s daily email, and with my mild success at making pork buns, I thought I would try it for Valentine’s Day. It was also an excuse to buy Asian soup spoons, which I was thrilled about!

There are three components to soup dumplings: soup, filling, and dough. The soup is made with pork skin, pork bones, and a pig’s foot (as well as some ginger, scallions, and Shaoxing wine). The skin contains so much collagen that when you chill the finished stock, it turns into a Jell-o like consistency, or meat Jell-o, if you will. Then you cut the jelled soup into small cubes and add it to the pork filling. As you steam the filled dumplings, the jelled soup melts and that’s how you get the soup inside the dumpling. The soup itself is simple enough to make–it’s like any other stock, but it does require a trip to an Asian market as conventional butchers don’t necessarily have pig’s feet and straight up pork skin you can buy. It’ll also be the best place to get black vinegar and Shaoxing wine, which you’ll need for the filling and dipping sauce. I also recommend making the soup the day before.

IMG_2558

chilled and cubed jelled soup ready to go into the filling

The filling is really easy. You just mix ground pork with some scallions, garlic, ginger, and other Asian sauces like Shaoxing wine, soy sauce, and sesame seed oil. And if you already cook a lot of Asian food, you will have most of these ingredients in your pantry. If not, as I mentioned above, a trip to the Asian market will get you those ingredients very inexpensively. Once all those ingredients are mixed, you add the cubed jelled soup to it.

Now for the dough. Compared to pork bun dough, this was a breeze. It’s literally just flour and water. You let it rest for an hour (I prepared the filling while it was resting), and then divide it into pieces to be rolled into dumpling skins. I knew shaping the dumplings would be difficult (18 pleats!), but I didn’t anticipate how difficult it would be to roll out the skins themselves. The dough was very sticky, so even when I got the dough into a nice round shape, it would stick to my countertop when I pulled it up, stretching it out and ruining it. I then added more flour to the dough to prevent it from sticking, but then it would get tough.

On top of that, I could not get a handle on how to get the appropriate thickness. The middle of the skins should be thicker (so they don’t break when steamed), and the edges should be thinner so that when you make all those pleats, the top of the dumpling won’t be tough and chewy. My dumplings were the exact opposite. The middle was way too thin, the edges way too thick. In the photo below, you can see my scrapped skins in the top right corner. And those skins on the top left are not exactly circles.

IMG_2559

Luckily, I had a back-up plan. I told a colleague of mine (who happens to be Chinese) that I was making soup dumplings. She commended me for the attempt, but also advised me to buy pre-made skins just in case the dough failed. So while at the Asian market picking up pig’s feet and Shaoxing wine, I grabbed a package of dumpling skins as well. Or what I thought were dumpling skins (there were so many kinds!). I was glad I took my colleague’s advise because the dough failed me, or more accurately, I failed the dough. But when I tried to pleat the store-bought skins, they didn’t stick! I was surprised and frustrated by this, and ended up using my homemade dough anyway because at least I could get it to close. At that point I lost all patience with trying to roll and shape the dumplings correctly, so I just filled and sealed the dumplings anyway I could just to get them made. I figured however misshapen, they would still taste good. It wasn’t until after I made all the dumplings that Andrew stepped in and told me that you have to wet the edges of store-bought skins with water to get them to seal (an embarrassing display of my ignorance, and frankly, my whiteness).

IMG_2563

my ugly dumplings

With the dumplings finally made, I set about steaming them. That was when I truly discovered why you don’t want the bottom of your skins to be too thin, because all the dumplings broke and lost all their soup. So in the end I just made regular dumplings. They were pretty thick and chewy on top because of how I carelessly shaped them, but otherwise they were pretty good, especially with the dipping sauce made of black vinegar, soy sauce, scallions, and ginger. Served with Chinese style green beans and a strong French 75 cocktail, it turned into a rather nice meal.

IMG_2565

I would definitely make this recipe again, but using store-bought skins (making sure to wet the edges with water, of course). It’s just not worth the trouble making the skins by hand. And despite how much I love making meals entirely from scratch, I’m learning that a good home cook also knows when to cut corners and still keep the integrity of the home-cooked meal intact.

Stay tuned for part 2 of this post to get the inside scoop on the tangerine sorbet I made for dessert (pun most definitely intended).

Recipes


Austin Eats

About two weeks ago Andrew and I went to Austin, Texas. The reason was to visit friends, the catalyst for going was to escape the craziness of Super Bowl 50, which was hosted in San Francisco this year. I went with the intention of eating lots of barbecue. I did not. Andrew and I quickly learned that you do little walking in the greater Austin area, and after one giant meal of basically all meat followed by hours of sitting in the car, we realized our dreams of days of barbecue were unrealistic. We were craving vegetables by the evening of day one of our trip.

Despite my inability to eat as much smoked and charred meat as I intended to, we still had incredible barbecue and great food. So if you’re ever in Austin and the surrounding area (and y’all who are going to SXSW), here’s a list of the stand-out places we went to, listed in order of when we visited, not in order of preference. It’s a bit of a long list so I’ll do my best to keep this short and sweet.

Franklin Barbecue Yes, the first thing Andrew and I did in Austin was wait three hours for barbecue. I have a hard time waiting in line three hours for any restaurant, but this place is famous and we were on vacation so we said, let’s do it. It was definitely delicious (look at those gorgeous ribs) but honestly, I wouldn’t wait in that line again for it. You can get great barbecue elsewhere without that kind of a wait. But I am fully aware that I am not from a state (or city) in which barbecue is a culinary tradition, so I can’t say I’m a connoisseur of barbecue. As long as it’s tender and the rib meat falls off the bone, I’m good to go. However, if you’re a foodie and don’t mind that kind of a wait, you won’t be disappointed with Franklin’s.

IMG_2492

LaunderetteThis is a cute small plates restaurant with good cocktails. I don’t know if their menu is seasonal, but I highly recommend the zucchini and the toasts.

Barley SwineThis place was incredible, and probably was my favorite restaurant we went to. It can be difficult to get in without a reservation, but our friend had the hook-up and we were able to get a reservation for a late dinner. It’s another small plates restaurant that uses local, seasonal ingredients. They also have a wall of pickled things in jars which I couldn’t help but love.

IMG_2507

We ordered at least half of the menu. Everything was amazing. You can’t go wrong.

IMG_2515

IMG_2511

Spanish mackerel

IMG_2512

Best octopus I’ve had to date.

TacodeliA great place for breakfast tacos, especially if you’re hungover. 😉

White HorseWe made it to a honky tonk! This place is a divey-lookin’ bar that gives dancing lessons earlier in the evening for when the live band comes one later. The crowd was a surprising mix of ages and styles. We even saw this poor guy lose his date to a tall cowboy, white Stetson and all, who literally swept this woman off her feet. That’s what happens when you can’t dance, fellas.

East Side KingThis is an Asian-fusion food truck that I guess has a permanent location at The Liberty, a bar in east Austin. It was something like 1 am by the time Andrew and I with our friends rolled into this place, and again, we ordered half the menu. The fried chicken sammy was excellent, especially after a number of drinks, and they had deep fried cucumber kimchi. Absolutely brilliant. Now I’m thinking of making my own cucumber kimchi just so I can fry it. Come to think of it, I wonder why it’s never crossed my mind to fry my own homemade pickles. I’m going to have to try that one day and blog about it.

C&J Barbeque. Our friends Mandy and Larry took us here the day we all went to College Station. This is one of their favorite BBQ joints and for good reason. Everything they had was excellent (ribs fallin’ off the bone and everything), plus they had the best barbecue sauce. It reminded me of the BBQ sauce my late grandfather would make. Even though they don’t bottle and sell their sauce, I got half a quart of it, put it in a big mason jar and took it home with me. I’m going to have to see if my mom has the recipe somewhere because that I have to make and blog about. This stuff needs to be shared. Unfortunately, there isn’t a location in Austin, but it’s a must-go-to place if you’re in College Station.

Lucy’s Fried Chicken. Last, but not least. This was the last place we ate on our way to the airport coming home. Our friend Bobby described it as a hidden gem, and he was right. It’s a cute place on Travis Lake, with tons of outdoor seating, a small stage where I assume they have live music, and a gorgeous view. It was sunny and warm when we went and it reminded me of The Marshall Store, one of our favorite places to go for oysters. Lucy’s has oysters, too, but they’re from the Gulf of Mexico and not as good as the ones we get on the Pacific Coast. I recommend sticking with the fried chicken.

IMG_2525

Our lunchtime view at Lucy’s.

Overall, it was a successful trip full of good food and great friends. We only scratched the surface of all that Austin has to offer and we will definitely make our way back there someday.  I’ll leave you with a few pictures from Hamilton Pool just because it’s so pretty.

IMG_2494

IMG_2495
IMG_2499

IMG_2501


Recipe Discoveries

Last week was not great. It was busy at work. I was distracted and annoyed. Unproductive. This weekend I was able to pull myself together a little bit. I caught up on a few (of the many) things I’ve been putting off, got some rest, finished a book, and spent some time in the kitchen trying new recipes with a good measure of success. So when you’re feeling a bit low and uninspired, these recipes can help pick you back up.

Mango Margaritas

I don’t recommend making these every time you’re feeling low, but they certainly can help celebrate the start of the weekend, particularly when you’ve had a hard week, and especially when you share them with good friends. As I mentioned in the Momofuku Pork Buns (part 2) post, margaritas are a great way to use up the leftovers of that mango puree from mango pudding. I loosely followed my girl, Ree Drummond’s recipe, using mango puree to taste in place of the jarred mangos (and adding very little, if any additional sugar). I love the lime zest and sugar rim–it announces a party in looks and taste. And party we did.

IMG_2444

Spicy Tomato Soup

Barbara Lynch’s Spicy Tomato Soup from Food 52 is a simple soup to make on a lazy weekend or a busy weeknight. The ingredients are minimal and the method is easy. It does require blending and straining, which is a bit of a hassle, but definitely worth it to get a good homemade tomato soup and skip the preservatives and sodium of the store-bought kind.

Warm Lentil and Potato Salad

Smitten Kitchen recently posted this recipe. I’ve been waiting for a new lentil recipe to catch my eye so that I can use up the dregs of all the lentils in my pantry. The dressing is a vague cross between the dressing in your traditional potato salad and a German potato salad, containing dijon mustard, shallots, capers, and cornichons. I knew I would love this recipe based on those ingredients alone. It’s another simple dish to throw together, although you have to use a number of pots, and will most likely have to go to the store to pick up those capers and cornichons and a few other things. However, you will come away with a great (healthy) work lunch for a few days to help get you through another busy week.

Potato Chip Cookies

Yes, these are a thing and they are just as good as you want them to be. This is another Food 52 discovery (seriously, if don’t subscribe to them already, do so now). I’m not much of a cookie baker. As I’ve mentioned before, I don’t find cookies to be all that exciting–to eat or make–but the whole game changes when you add crushed potato chips. This recipe does not disappoint, and I have 15 coworkers who can back me up on that. And this photo…

IMG_2470
My only regret is that I didn’t come up with this idea myself.

Pizza Party!

When I was growing up, Saturday was pizza night. My mom would order pizza, spread out an old table cloth on the family room floor, and my family of five would eat picnic-style in front of the TV. As kids, it was our weekly treat, and for mom, it was her night off from cooking, so a treat for her as well. Usually we’d watch Jeopardy, or James Bond movies when TNT hosted its annual 007 marathon. It’s a mundane childhood memory, but a fond one all the same.

As an adult, I don’t have a TV, let alone cable. And I don’t have to wait for TNT to watch James Bond movies thanks to Netflix. Instead of ordering in, I can be fancy and make it myself. I also don’t have to wait for Saturday to have it. But there is something comforting about pizza on a Saturday night.

Before I moved in with Andrew, my former roommate Andrea and I would make pizza every so often. Actually, one of the first meals we made together after she first moved in was pizza, which made it very fitting when she and her boyfriend, Scott, gifted us a pizza steel for our wedding. So of course when Andrew and I hosted Andrea and Scott for dinner last Saturday, we had to make them pizza using the pizza steel they got us.

Andrea and Scott

Andrea and Scott

With me being me, I wanted to make the dough and the sauce from scratch. That was actually the easy part. I found a good dough recipe on Smitten Kitchen, which is honestly a little complicated to read through, but the recipe itself is very easy. You mix flour, yeast, a little salt, and water in a bowl with a large spoon and let it sit over night. That’s it. You don’t need a standing mixer with a dough hook. You don’t have to kneed. You don’t need to adhere to a precise proofing schedule. The dough will look like this after first mixing:

IMG_2421

Then it turn into this after sitting for about 20 hours:

IMG_2425

The dough is a bit sticky and you do have to work it a little to get it into a nice, round pizza shape, but flour your hands and the sticky dough is not much of a problem. Smitten Kitchen’s dough recipe also contains an easy and tasty pizza sauce recipe as well.

Of course, you don’t have to make the dough and sauce from scratch to have good homemade pizza. You can buy dough and sauce at the store and still have damn good pizza. I’ve done it. You’ve probably done it. We know it’s delicious. For me, the difficulty in making pizza at home is with transferring the prepared pizza onto the hot pizza steel for baking. Raw pizza dough is notoriously sticky, and it always sticks to whatever I roll it out on, and through my scrambling to try and get it on the steel, I often ruin the pizza entirely or it ends up misshapen. Using cornmeal to coat the bottom does work, but I have to use so much cornmeal that it changes the texture of the bottom of the finished pizza, making it rough and a little grainy. Like sand. Bleh.

What ended up working the best, for texture and for ease, was to prepare the pizza on parchment paper, coating it a little with cornmeal to help keep the dough from sticking while you’re shaping it. Then slide the prepared pizza, parchment and all, onto the hot pizza steel. It slides on without a problem and if it’s not positioned well on the steel, you can take the corners of the parchment and easily adjust the pizza’s position without burning yourself. It’s probably cheating on some level, but it beats ruining the pizza and getting frustrated.

So after some trial and error with our transferring strategy, we came away with four pretty good pizzas. One pizza did perish in the process, requiring me to dip into one of the Trader Joe’s doughs we bought just in case there was a mishap with one of the pieces of homemade dough. At least I planned that well. In the end our plates were a smorgasbord of bread and toppings, with some salad to make ourselves feel like we were being healthy.

IMG_2430

Slices from four pizzas: BBQ chicken w/ cilantro; ricotta with za’atar and ricotta; sausage and mushroom; prosciutto and arugula.

And of course, there was dessert. What kind of Kim dinner party would this be without dessert? I dug into one of my Food 52 cookbooks and found a recipe for Aunt Mariah’s Lemon Sponge Cups. It uses simple ingredients, most of which I already had, and is baked in ramekins, my favorite dessert-delivery method. What intrigued me about the recipe is that it is described as a mix between a souffle and a custard because as the “cups” cook, a spongey cake forms on the top while a lemon custard naturally pools on the bottom. Yes, please!

The trickiest part about this recipe is beating egg whites and folding them into a very liquidy batter. I always have trouble beating egg whites, you know, the two times a year I need to do it. I never really know when they’re stiff enough. How stiff can egg whites really get? I usually end up over beating them so that they start to liquify again, which did indeed happen while I made this recipe. I should YouTube this and get some tips. Or call my mom, who can give cooking advice on almost anything. (Mom, please leave a comment on this post if you have suggestions for me!)

Because the batter was more liquid than batter, I found it difficult to  fold the egg whites into it really well. It just didn’t meld well. There were  definitely some lumps of egg whites. But I didn’t want to over fold and lose the airiness that would give the cups their light and fluffy texture. So I stopped before I could do real damage.

In the end I would give them a score of 7 out of 10. The cake part of the dessert was excellent. It was spongey, had a lovely lemon flavor without being overpowering or too sweet. Look at my beautiful tops:

IMG_2426

But I lost points on the custard. While it tasted good, the texture was off. It was not very smooth, was a bit runny, and did not hold it’s shape when I turned out the ramekins onto a plate. It just spilled all over the plate in a yellow mess. I’m pretty sure this had to do with my egg white problem. This was the only serving that came out decent:

IMG_2432

I will definitely make this again, but next time, I will serve this directly in the ramekins rather than try to be fancy and turn them out. It’ll hide my custard flaws.

Momofuku Pork Buns (part 2)

As I mentioned in Part 1 of this post, Andrew and I hosted two dinner parties New Year’s weekend. The first dinner was with our siblings, and the second was with our good friends Katy and Josh. They shared valuable wedding tips with us when we first got engaged, and continue to be a support during our first year of marriage. It’s good to have friends who have forged ahead in the Game of Life to help guide those of us coming up the rear. This is their Christmas card. This is how stinking cute they are.

IMG_2416

Katy is a fellow food-lover and blogger and she and I have swapped many recipes and kitchen stories over the years. She’s also very encouraging of my kitchen adventures when I make things way beyond my skill level. So when deciding what to make for her and Josh, pork buns easily made it to the top of the list. It was adventurous, something she probably wouldn’t make herself, and she would be extremely gracious even if it turned out terribly. (Which, we already know it didn’t, thank goodness!)

Since the hard part of the meal (the pork buns) was made the day before, I had time to supplement the meal with additional dishes. To keep with the Asian theme, I served spicy pan-fried noodles, Thai salad (made by Andrew), and mango pudding.

Spicy pan-fried noodles is one of my go-to weeknight recipes. It’s really easy to throw together and the leftovers reheat well. I’ve made it with all kinds of Asian noodles, whatever I had on hand or could find in the store, and it turns out well every single time. The only mishap I had with it this last time was that I forgot we ran out of soy sauce and had to run down to the corner store to get some. It was an inconvenience but nothing earth shattering. But then, right when I drained the cooked noodles, I realized that I didn’t have enough—I meant to double the recipe and realized that I only bought one package of noodles. Noodles are the main ingredient, and I forgot to double it! What is wrong with me? How could I have missed that detail? I was pissed. Making that kind of amateur mistake is just not acceptable to me, especially when I’m hosting. So I was huffing and puffing during the rest of my preparations, disappointed in myself, and rushing because I was running behind (as usual). It was an embarrassing display of childish attitude, even if Andrew was the only one to witness it (God bless his patience), because in the end it was fine. There were plenty of noodles to go around without doubling the recipe.

The Thai salad is Andrew’s take on the Thai chicken salad at Park Chow, a lovely and homey SF restaurant. The key to this salad is the dressing. It’s citrusy and spicy and has a quintessential Asian flavor, which we learned can really only be re-created using two essential ingredients: fish sauce and ground dried shrimp. You can’t taste their individual flavor in the finished dressing, but you can tell when they’re missing. Other than the dressing, the salad is comprised of basic salad ingredients: romaine, red bell pepper, carrot, cucumber, red onion, and roasted peanuts. You can find the full recipe at the end of this post.

So, in addition to the pork buns (which Katy said tasted just like Momofuku’s!), we had a well-rounded menu.

IMG_2411

Noodles and salad

IMG_2414

Now, for the dessert. I am not all that familiar with Asian desserts. So, as one does, I Googled Chinese desserts and mango pudding was one of the first recipes that came up. It’s pretty straight forward to make, like a slightly more involved jell-o. You just have to make it a few hours ahead of when you want to serve so the gelatin can set. I used Chowhound’s recipe and made it for both dinner parties to keep planning simple. The first night I used fresh mangos that weren’t quite ripe enough, and the second time I used frozen mangos to see if there would be a difference in taste. There wasn’t really. Andrew and I noticed a slight difference in texture, but the taste was basically the same. If you make this recipe, use whatever kind of mangoes you prefer. Fresh or frozen, it doesn’t make that much of a difference except in the mess you make cutting the fresh mangoes. Also, no matter which kind of mango you use, you will have leftover mango puree, which I froze and intend to use for mango margaritas next time I host a Latin-themed dinner.

IMG_2410

It was a busy weekend in the kitchen for sure, but a successful one, even with all of my ups and downs. I came out of the weekend with a number of takeaways, including my 2016 New Year Cooking Resolutions:

  1. Improve my planning skills, really reading and understanding recipes before setting out to make them.
  2. Give myself grace when I make mistakes, which I inevitably will.

So cheers to 2016, when I will forgive my flaws, learn from my mistakes, and laugh when all else fails. Happy New Year!

Recipe Links

Thai Salad Dressing

Adapted from Bruce Cost’s “Thai Cucumber Salad” recipe published in The San Francisco Chronicle Cookbook Volume 1.

INGREDIENTS

  • 3 tbsp lime juice
  • 1 ½ tbsp fish sauce
  • 3 tbsp red chili pepper (Serrano or jalapeno works too), sliced into thin rounds
  • 2 tbsp dried baby shrimp (ground)
  • 2 tbsp sugar
  • 1 tbsp peanut oil
  • 2-3 tbsp chopped red onion and/or cucumber (optional)

METHOD

Mix all the ingredients together. Adjust the fish sauce and/or lime juice to taste. Then, dress your salad with however much dressing you like. For the actual salad, we typically chop romaine lettuce, add red bell pepper and carrot (preferably julienned), red onion, cucumbers, scallions, and top with roasted peanuts. If we want to make it a main meal we’ll add chicken. You can also keep it meatless by adding edamame or tofu as the protein.


Momofuku Pork Buns (part 1)

Momofuku is one of my favorite restaurants in New York City. Every time I visit I drag my friends to the noodle bar  so I can have their ginger scallion noodles and pork buns. A few years ago Food 52 posted the recipe for Momofuku’s Pork Buns and I’ve been wanting to make them ever since. The main reason I waited so long to try them was because I didn’t have the necessary cooking tools, specifically a roasting pan, standing mixer, and a steamer. The wedding registry took care of the roasting pan, I was able to borrow a standing mixer from a friend, and the steamer was cheaply procured from a local Asian restaurant supply store. I finally had the necessary tools, a long New Year’s weekend to spend time in my kitchen, and a group of family and friends willing to eat this experiment of mine, because it certainly was an experiment. There was a high likelihood this recipe was going to end in a complete disaster.

Originally, Andrew and I were just going to host our friends Katy and Josh for dinner the day after New Year’s Day. We wanted to make them something they wouldn’t necessarily make themselves, and I took it as a great opportunity to try pork buns. But as I looked at the recipe I realized it made 25 pork buns. Pork buns are delicious, but 25 pork buns for four people is a bit excessive. So when I realized Andrew’s brother, Fred, was still going to be in town over New Years, I invited our siblings over for a New Year’s Day dinner to spend more time with family, but really to have them help eat the leftovers. Well, technically Katy and Josh ate the leftovers as they came over January 2, but they are gracious friends and didn’t take offense that I served them leftovers. Emily Post would not approve, I’m sure. Katy and Josh’s dinner will be recounted in Part 2 of this post, coming soon.

Because I was hosting two dinner parties back-to-back, I had to plan well. I have a bad habit of not reading a recipe in its entirety before cooking. I’ll skim it and say, “I got this,” only to get to mid-way through and realize I missed something critical in the prepping phase and the whole recipe gets thrown off. Then I’m left frantically scrambling to recover and get the recipe back on track without doing too much damage. Pork buns are not something you can just throw together and I made sure I took the time to read through the recipe and plan my day so everything would come together.

I had my schedule of when I was going to start each phase and was ready to roll. Everything was going well. I made the rub of sugar and salt and marinated the pork belly over night. Then I put it in the oven the next morning. While that was cooking I prepped the mango pudding for dessert (more on that in Part 2). That put me right on schedule to start the dough for the buns. Success! I planned well! And then… I missed something critical, in pure Without a Cellar fashion. You need 1/3 of a cup of the rendered fat from the pork for the dough, so you have to make sure the pork is done before you start the buns. I didn’t plan for that. My pork wasn’t going to be done for another hour! In a second I went from being right on time to running behind schedule an hour. UGH. So while I waited, I prepped what I could and cleaned the apartment.

In hindsight, I could have taken the fat I needed before the pork was done cooking, but at the time I thought that would hurt the final outcome of the pork so I just waited. Lesson learned. But finally the pork was done, looking absolutely beautiful, and I had my fat.

IMG_2402

That’s a beautiful lookin’ belly!

I proceeded to mix the dough in the standing mixer and set it in a bowl to rise for an hour. After an hour, I went to punch it down and start on the next step. Only the dough didn’t rise. UGH. Again. I suspect a few things could have gone wrong with the dough:

  1. The yeast was bad, which I doubt.
  2. The room temperature water the recipe instructed to use to dissolve the yeast was actually too cold and I should have used lukewarm water instead.
  3. I should have let the yeast sit and activate for at least a few minutes before adding the other ingredients, an instruction the recipe didn’t say I needed to do.

I suspect bullet #2 was the culprit, so the next time I make pork buns (and I definitely will) I’ll use warmer water. But with siblings coming over in a few hours, it was way too late to try another batch of dough. I just had to move forward with what I had and hope for the best.

The next step was diving the dough and rolling it into balls. The balls were supposed to be about the size of ping pong balls and weigh around 25 grams. After making a few mistakes already with the buns, I didn’t want to take any more unnecessary chances so I literally weighed each ball on my scale.

IMG_2398

Then I let them sit for another 30 minutes so they rise some more. They didn’t. Not that I was surprised since the dough never really rose to begin with. The next step was to roll out the dough in 4-inch ovals, fold them into buns using a chopstick, and place them on individual squares of parchment (cut out while I was waiting for the pork to finish).

IMG_2400

Because the dough didn’t rise, my buns were a bit on the small and thin side, but I did my best. This was fairly time consuming because even though the recipe says it makes 25 servings, you end up making 50 buns, probably because if you are going to go through all of this trouble to make them, you might as well make enough to freeze for later.

After the buns are folded, you let them sit for another 30 – 45 minutes. Then you steam them in batches (on the parchment so they don’t stick) for 10 minutes.

IMG_2415

This is another instance where I miscalculated. With one steamer that only fits 5-6 buns at a time, it didn’t fully register in my brain that it would take about an hour to steam all 50 buns. My plan was to have at least most of the buns steamed by the time everyone arrived. But with my hour delay, I didn’t start cooking until everyone had arrived. Fortunately, I had a few things going for me so that this circumstance didn’t ruin the dinner:

  1. People had food to eat while I finished the buns. I knew making the pork buns would take up all of my time, so I assigned side dishes and appetizers to my sister and sister-in-law.
  2. The pork buns can easily be assembled in batches. As soon as I had enough buns steamed for everyone, I filled the buns with hoisin sauce, pork belly slices, quick-pickled cucumbers, and scallions. And then kept on steaming.
  3. Because I live in a studio, being confined to my kitchen doesn’t mean I have to be away from my guests. They are literally sitting right next to me while I cook. So while it’s not ideal to still be stuck at the stove, at least I can still interact easily with everyone.
  4. I warned everyone this may not turn out well, so I didn’t feel as much pressure to have everything be perfect.

Considering all the mishaps with the dough, the pork buns overall turned out pretty well. The pork belly itself was excellent. Crispy, salty, with excellent texture for being such a fatty cut of meat. The buns were decent. They were a bit dense and dry, and some broke apart at the seams when you opened them. If the dough had risen properly I imagine they would have been softer and more pliable. But they weren’t rock hard and still soft to bite into, and they tasted really good. Not bad at all for a first attempt!

IMG_2413

IMG_2406

IMG_2408

Sibling and Co. party! From the left: Audrey, Sam, Kristin, Andrew, Fred, and Daniel.

Stay tuned for Momofuku Pork Buns (part 2)…

The best ramen in San Francisco

It’s December 28 (29th by the time you read this), Christmas is over and 2016 is almost here. Andrew and I were very busy this holiday season and with New Year’s Eve still to come, we are not quite done with our social engagements. I’ll be in my kitchen on New Year’s Day preparing not one, but two, dinner parties we’re hosting this weekend. So in these few quiet days in between, we won’t be cooking much.

Andrew and I have our usual quick and easy restaurants when we don’t feel like cooking. Recently, we added a new one to our list: Coco’s Ramen. It’s in Bernal Heights, on Mission Street, not far from our apartment, and it’s my favorite ramen place. I will even go so far as to say that it is the best ramen in San Francisco. I usually can’t eat an entire bowl of ramen in one sitting. The portions are always too big and often too rich or too salty, depending on what kind of broth I choose. Coco’s Ramen has struck what seemed to be an impossible balance, at least for my palate. Now, whenever it’s cold and we want something warm and comforting, we go to Coco’s. And I eat it all.

Andrew always gets the shoyu ramen, the chicken and pork stock having an aged soy sauce base. It comes with the usual toppings, pork (of which you can choose between two different cuts), nori, egg, and some sprouts, green onions, and bamboo:

IMG_2041

shoyu ramen

I tend to get the miso ramen, which, as the name tells you, has a chicken and pork stock with a miso base. Not that the miso ramen looks much different than the shoyu, but here’s a photo of it anyway:
IMG_2040

miso ramen

I’ve also tried the veggie ramen when I wanted something a little lighter. I was nervous that it wouldn’t be as good as the miso (because how can veggie stock beat pork?), but it was just as good, if not better, than the miso. The broth is very flavorful and you get to choose which kinds of veggies you want, so you can customize it to your liking. I am partial to bamboo, cabbage, and bean sprouts, but you can also get tofu and corn.
IMG_2232

veggie ramen

After eating, our bowls look like this:
IMG_2042

empty ramen

And then we feel like one of these:
IMG_2043

I ate so much I feel like a cow but I’m so happy ramen

Andrew says I should learn to make ramen. But ramen is all about the broth, and I do not have the time or patience to perfect ramen broth, so I will gladly leave it to the professionals at Coco’s. And for my fellow San Franciscans, I know Bernal Heights is out of the way for most of you, but it’s worth the trip. If you need extra incentive, I will gladly be your dinner date!